Checklist For Correct Printing
“After ordering, you can download layout guides for all
selected printing specifications”
selected printing specifications”
To create a print file, you must know the following.
Files that do not follow the rules will eventually need to be fixed and the order process will be delayed accordingly. After you put in an order,an e-proof will be created by a printing factory. During the creation of an e-proof, if there are problems with the file, the print factory will notify the customer to fix the file, but that's just an ancillary service to help you. If the factory does not recognize the following problems in the file, the factory will not be held responsible even if the e-proof is created and presented. Design-related issues are solely the responsibility of the customer. So it's always a good idea to check that all the rules below are followed when creating a file.
Files that do not follow the rules will eventually need to be fixed and the order process will be delayed accordingly. After you put in an order,an e-proof will be created by a printing factory. During the creation of an e-proof, if there are problems with the file, the print factory will notify the customer to fix the file, but that's just an ancillary service to help you. If the factory does not recognize the following problems in the file, the factory will not be held responsible even if the e-proof is created and presented. Design-related issues are solely the responsibility of the customer. So it's always a good idea to check that all the rules below are followed when creating a file.
01. Page Size
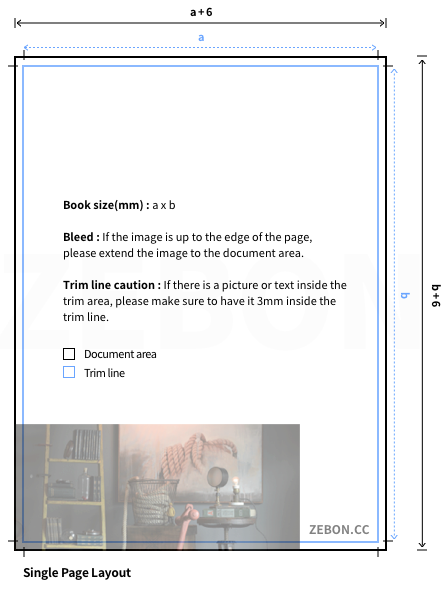
The finished file size is your trim size. All files should have proper bleed, trim and safety. Bleed is required for all print jobs and should be .125”(3mm) on all four sides. For
example, if your trim size is 8.5” x 11”(216x279mm), your bleed size is 8.75” x 11.25”(222x285mm) and all text should be at least .125”(3mm) inside the trim to allow for a safety
margin. Having bleed prevents white edges from showing if the cut is too close to the border.
02. Bleed and Trimming
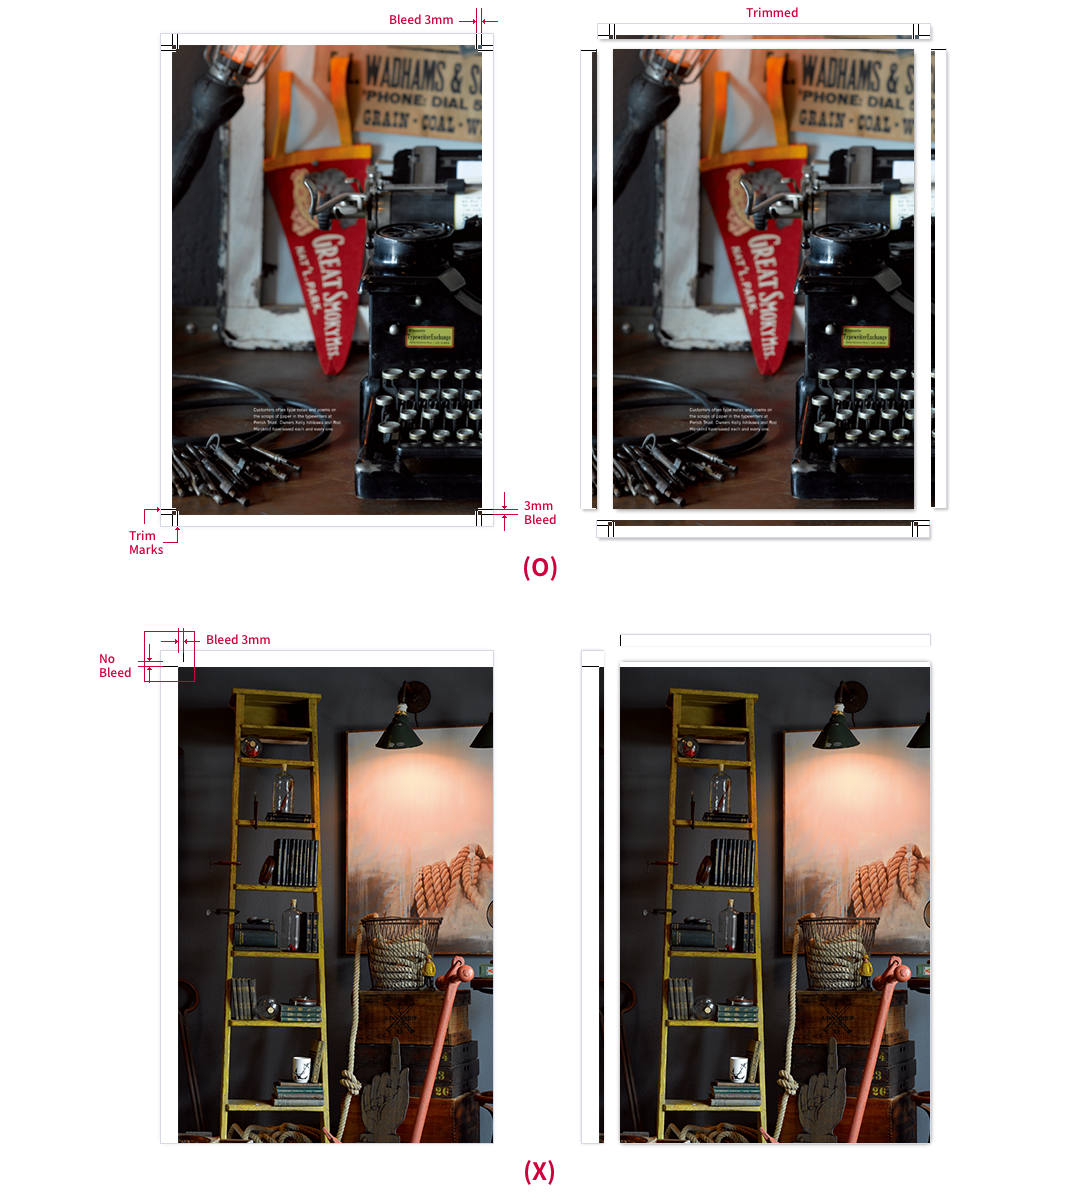
The main delay that we encounter when modifying files before making a proof for a client, is due to bleed and bleed marks.
When binding the pages together, they need to be trimmed so that they are all exactly the same in size. This prevents the magazine/catalog from having an uneven edge that
looks unprofessional and messy. In order to be able to trim the pages without cutting any of the page elements off, the pages should have a bleed area. A bleed is required
around all four sides of the page; a safe zone for trimming. Without a bleed, if the page is exactly the dimensions needed (e.g: 8.5”x11"), trimming cannot be done properly
and the pages may end up uneven or with white edges.
03. Saddle stitching
If the binding choice is saddle-stitching, you do not need to worry about the layout of the cover. Just export your entire file as single pages into one PDF in consecutive order.
04. Perfect Binding
To calculate the spine size for perfect bound publications, you will need to calculate the weight of the paper stock multiplied by the number of pages in the publication. We
have an automatic calculator in our quote tool that will generate the spine width once you input your specifications.
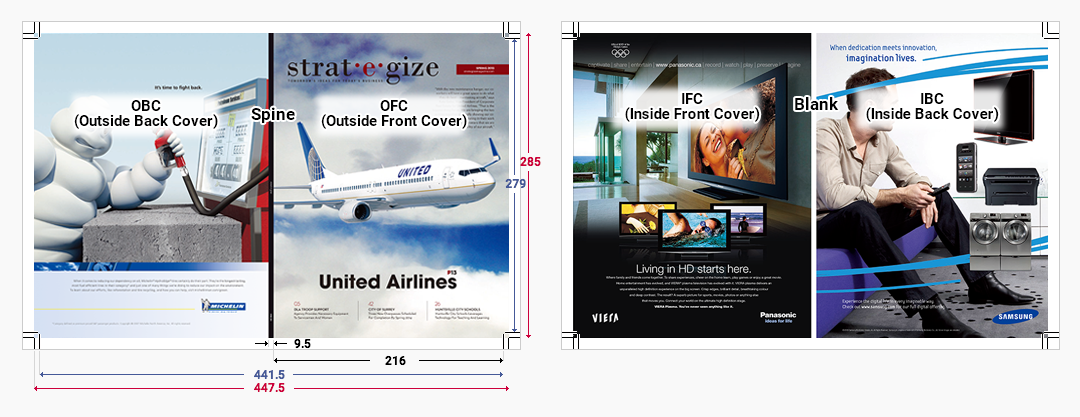
When making the layout, you will need to include the spine with your covers. For example, an 8.5” x 11” document with a .375” spine should have a width of 17.375”(=8.5” x 2 + 0.375”)
and a height of 11”. And if you add bleed for safe trimming, the overall bleed size should be 17.625”(=17.375” + 0.125” + 0.125”) x 11.25”
The image on the first page-from left to right-will include the Outside Back Cover (OBC), followed by the spine, followed by the Outside Front Cover (OFC). The image on the second page will include the Inside Front Cover (IFC), followed by the spine, followed by the Inside Back Cover (IBC). The inside spine should be left completely blank. If there is a printed image on the inside spine, the glue used to bind the publication will not properly adhere to the paper and the pages will eventually loosen and fall out. A blank inside spine allows the glue to better adhere to the paper.
The image on the first page-from left to right-will include the Outside Back Cover (OBC), followed by the spine, followed by the Outside Front Cover (OFC). The image on the second page will include the Inside Front Cover (IFC), followed by the spine, followed by the Inside Back Cover (IBC). The inside spine should be left completely blank. If there is a printed image on the inside spine, the glue used to bind the publication will not properly adhere to the paper and the pages will eventually loosen and fall out. A blank inside spine allows the glue to better adhere to the paper.
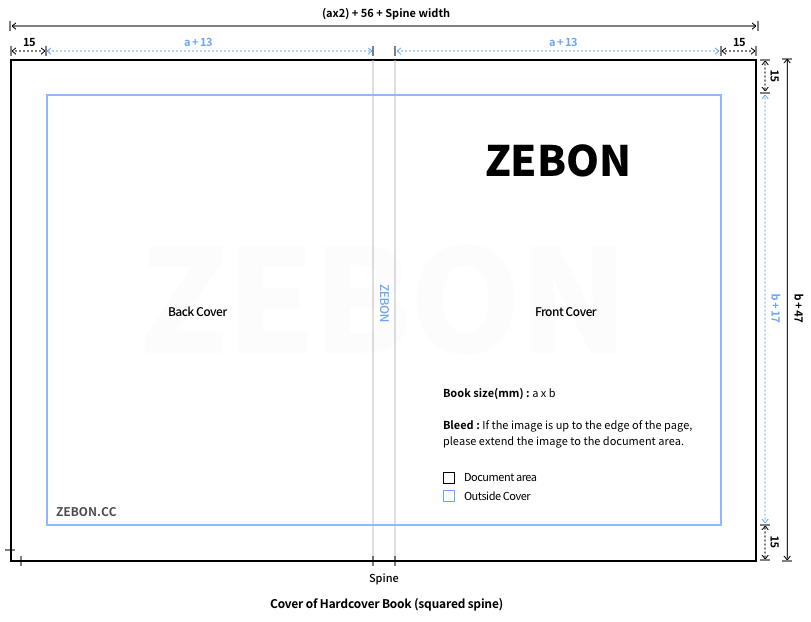
05. Hardcover Book
The covering of the book should be designed in an unfolded form (as spreads). The width of the book (spine) is calculated by summing the thickness of the inside paper, end
paper, and the thickness of the hard board, which can be found in the ZEBON quotation program.
If you have an image on the covering background, you should expand the image into the turn-in area. The turn-in of the covering should be .59 "(15mm) on all 4 sides, and
the horizontal width of the outside should be .512" (13mm) for squared spine, and .36 "(9mm) for round spine. For vertical width, .67 "(17mm) should be added regardless of
spine shape.
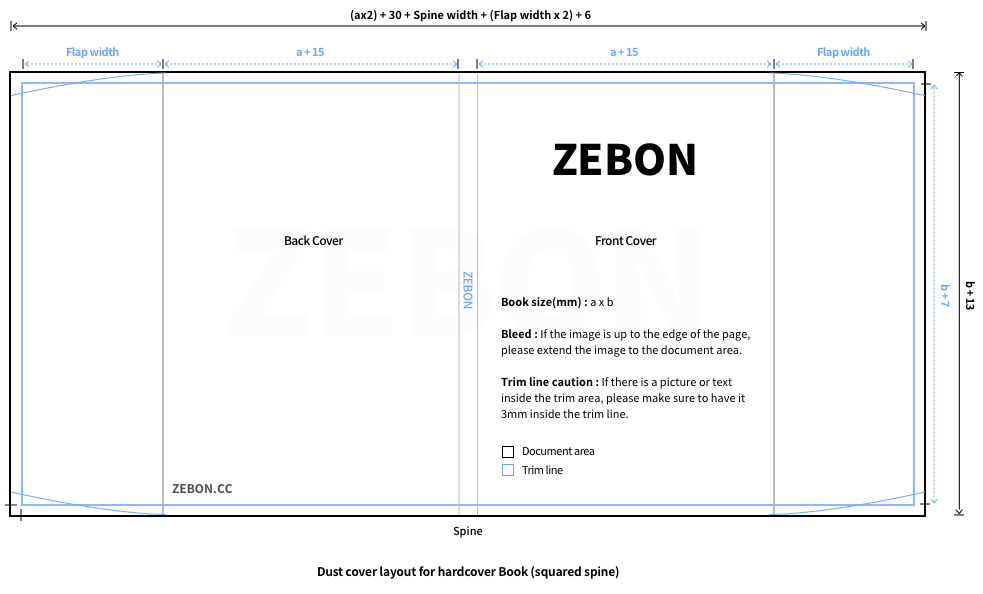
06. Dust Cover
If you are ordering a dust cover for your book you will need to supply a third PDF file for your dust jacket in addition to your cover and text PDF files.
The dust cover PDF file should be a flat spread showing all 5 parts of your dust cover from left to right; inside back flap, back cover panel, spine panel, front cover panel, and
inside front flap.
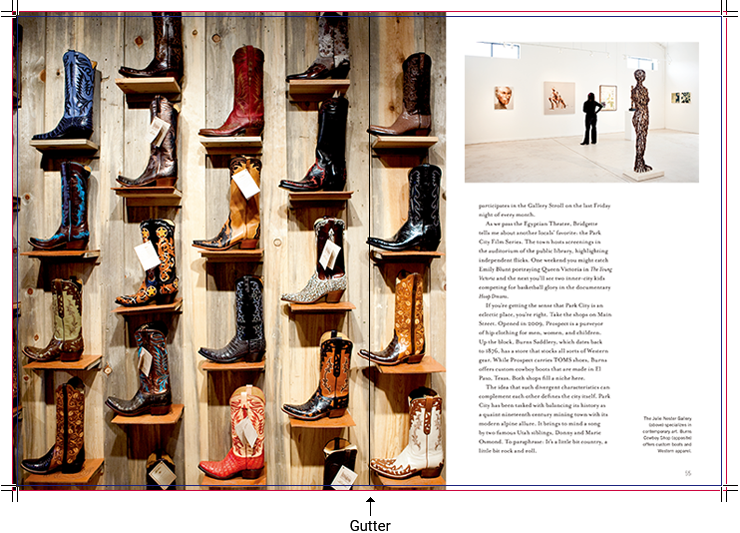
07. Spread Layout
For any spreads that have images going beyond the gutter, it’s important to understand that the image in the bleed area should be overlapping for the left and right hand
page.
A correctly laid out spread in InDesign looks like this:
A correctly laid out spread in InDesign looks like this:
And when exported into a PDF as single pages with bleed and marks, the image area in the bleed should be overlapping as seen below:

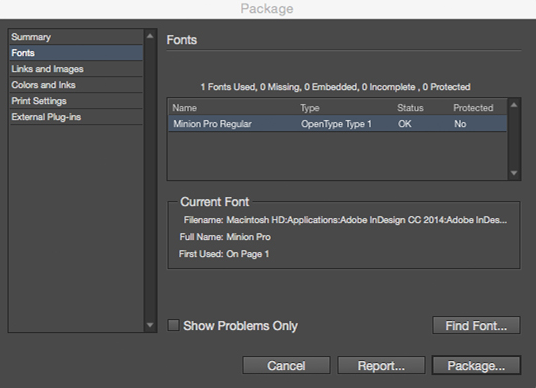
08. Fonts
We suggest that you use Open Type or PostScript Type 1 fonts and to avoid TrueType fonts. When a TrueType font and a PostScript Type 1 font with the same name are
active on your computer it can cause many potential inconsistencies. It is crucial that you submit all fonts used, including those in EPS graphics. Even if you are using a
common font such as "Helvetica", your font's version may be different from ours. Please embed all fonts. Note that all black text needs to be K value text only (C0 M0 Y0
K100.) Check the fonts you used in the document in case you need to remove anything that has been saved on the pasteboard.
09. Image Color & Resolution
Please make sure that all colors are in CMYK mode and that images are at least 300 dpi. Printing presses require CMYK (Cyan, magenta, yellow, black) mode. If your images
are in RGB (Red, green, blue) mode, the printed result will appear muddy and flat. To avoid this, convert all images to CMYK. If you have spot colors (i.e. Pantone colors),
please ensure to convert all spot colors into CMYK as well, unless it’s intentional and you’d like to add a 5th color plate due to color sensitivity guidelines on logos, etc. Please
note that an additional printing plate will resonate in an additional charge. The artwork, as it appears on your computer screen, is almost certainly not accurate since every
computer screen renders color differently. An on-screen proof cannot match the color or density of a printed piece. Even different software on the same computer can
render color differently. For these reasons, we cannot be liable for color variations between submitted files and the final printed piece. If color is critical, you should request a
hard copy digital proof which will be printed on our digital printer and is set to match colors of our press, but won’t be on final paper stock nor bound. Or you can send over a
SWOP proof of an example page to our office in Korea that you’d like to match the color to, and we’ll match the entire project based on that.
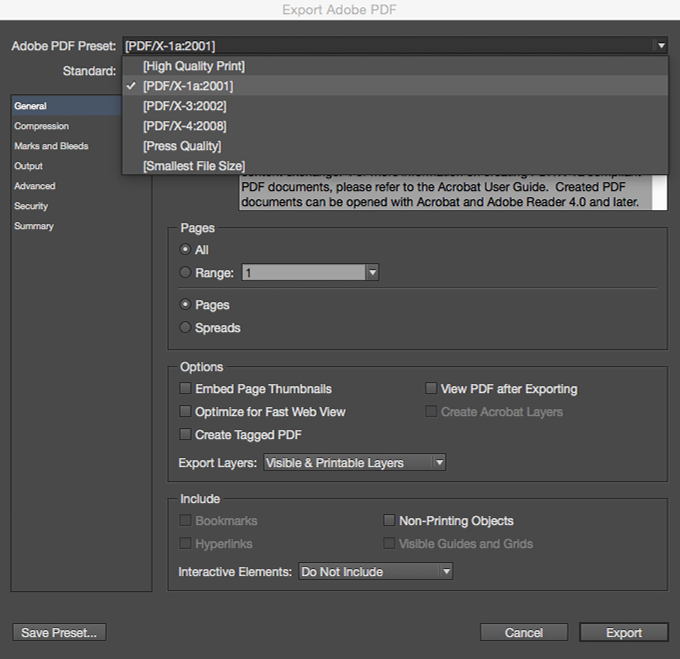
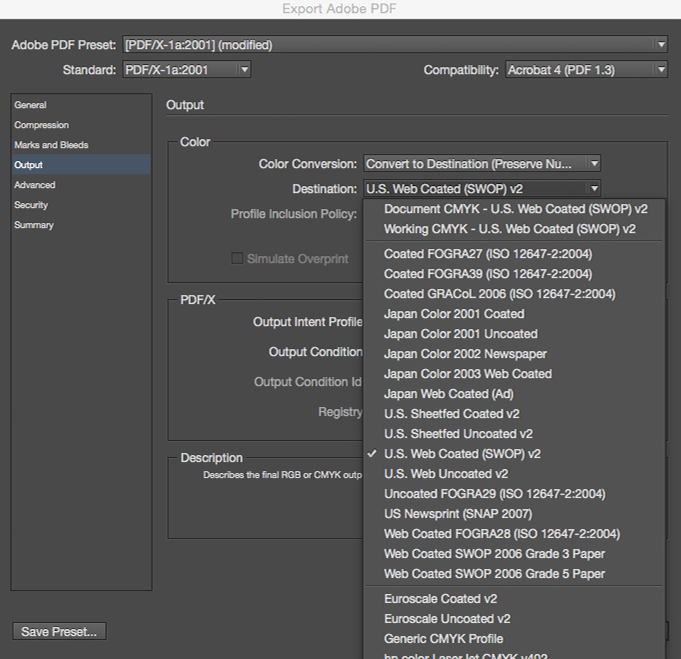
When exporting to a PDF, please choose “U.S. Web Coated” for the color output:
When exporting to a PDF, please choose “U.S. Web Coated” for the color output:
10. Black vs. Rich Black
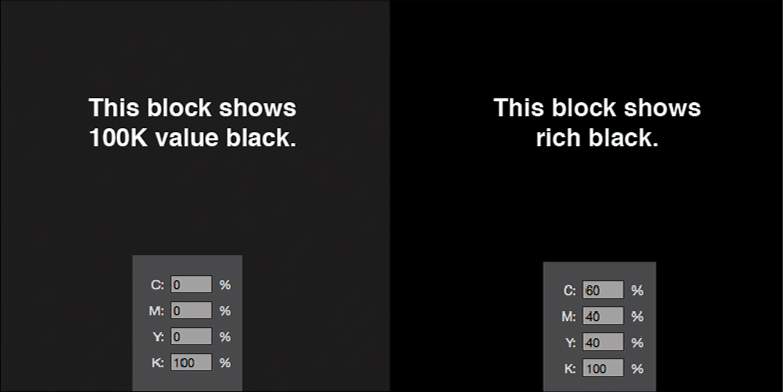
When printing with black color, there are two types of black you can use. The standard black is C0 M0 Y0 K100 and can be used for body copy and barcodes. Rich black
should be used when using blocks of black. The rich black value is up to you and recommendations differ from site to site, but as an example you could use C60 M40 Y40
K100.
Below is an example to show the difference between black and rich black. The left will show you 100K value black and the right will show you rich black. The difference will be hard to tell on screen depending on your monitor calibration, but it will be noticeable on the actual printed piece.
Below is an example to show the difference between black and rich black. The left will show you 100K value black and the right will show you rich black. The difference will be hard to tell on screen depending on your monitor calibration, but it will be noticeable on the actual printed piece.
11. Additional Finishes
If you have embossing, foil stamping, die-cut, or spot UV, please note that you need to upload an additional PDF with everything that will be embossed / foil stamped / diecut
/ spot UV coated in black, and everything else blank.
The below example shows how the front cover looks like:
The below example shows how the front cover looks like:
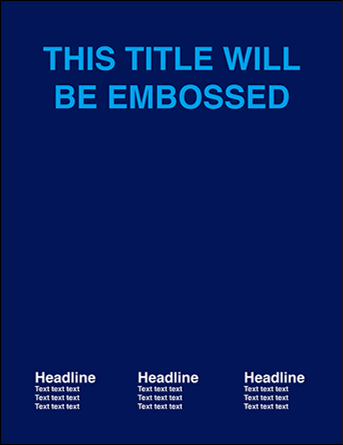
So, in addition to that, the embossing file will show only the portion to be embossed in black and everything else blank just like in the example below:

12. PDF Export & File Size
If you choose saddle-stitch binding for your project, please export all pages as single pages into 1 single PDF file in consecutive order. The color output should be U.S. Web
Coated and the PDF should be exported as a PDF X1-a. This will keep the file size down, while still having a hi-res file.
If you choose perfect binding, we require 2 PDFs. One PDF is for the cover pages which contains two spreads: the first spread will have the outside back cover, spine, and outside front cover; the second spread will have the inside front cover, a BLANK inside spine, and the inside back cover. The other PDF will have the inside pages which will need to be exported as single pages.
If you choose perfect binding, we require 2 PDFs. One PDF is for the cover pages which contains two spreads: the first spread will have the outside back cover, spine, and outside front cover; the second spread will have the inside front cover, a BLANK inside spine, and the inside back cover. The other PDF will have the inside pages which will need to be exported as single pages.